March 27, 2006

How to: Add a Styled Flickr Photo Stream to Your Blog 56

Yo! Have you checked out the Thesis Theme yet? I’d love to explain how optimized, detailed, and easily-customizable Thesis is, but honestly, I know that you’re going to benefit the most from the amazing community of theme users. Smart people offering up tailored solutions to common theme problems? Now that’s serious value.

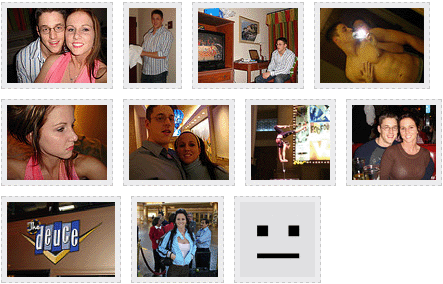
Adding uniquely-styled Flickr photo streams to your blog is easy, and it’s just another thing you can leverage to make your blog stand out among the crowd. Today, my goal is simply to walk you through the process of creating your very own photo stream so that you can end up with something like this:

Step one: grabbing your Flickr badge

Alright, I guess now’s a good time to mention that I’ve already assumed a couple of things here:

  • First, that you have a Flickr account
  • Second, that you have already uploaded some pictures to that account

If you said “yeah…..yeah!” to the above items, then you’re ready to rock.

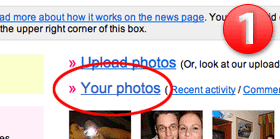
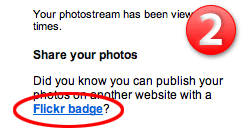
(1) Go ahead and log in to your Flickr account, and then click on the “Your Photos” link to access the - wait for it - “Your Photos” page. Once there, direct your eyes to the rightmost column and (2) look for the “Flickr badge” link underneath the heading, “Share your photos.” Click on that bad boy, and you’ll be directed to a new page where you can go through the stepwise process of setting up your Flickr badge. So far so good, right?

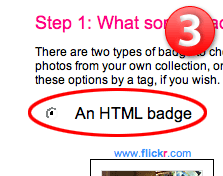
When you reach the badge setup page, (3) the first thing you need to do is select the option to create “an HTML badge” and then click the “next” button below the pictures. On the next screen (which isn’t worth picturing here), go ahead and use the default configuration, which is set to display “all of your public photos,” and then click “next.”

Now you get to choose your photo layout options. Basically, your choices will determine parameters that will be passed along in a snippet of JavaScript that you’ll have to include in the source code for your site (this may sound bad, but it’s dead simple). Fortunately, all of this is automated for you, so (4) choose your display options and move right along. I’ve included my list of recommended options below. Oh, and make sure that last option is “None!”

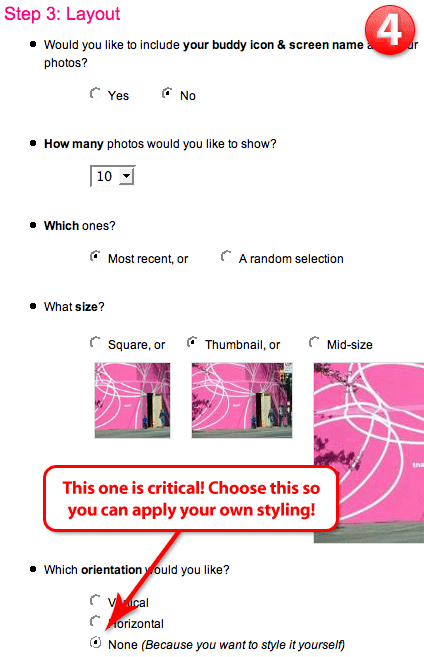
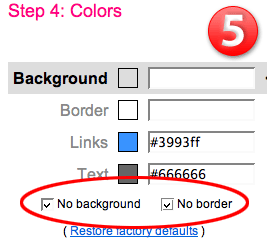
Double-check that last option to make sure you selected “None (Because you want to style it yourself)” and then click “next.” On the ensuing screen, (5) simply select the two options for “no background” and “no border,” and then scroll down and click “next” once more. You don’t want to choose any colors because you’re going to style everything - the borders around the pictures and the way in which they’re presented - yourself. Stick with me here, and you’ll be a Flickr maven in no time.

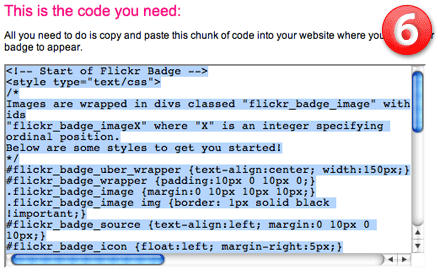
Flickr will now display your unstyled badge in vertical format. Underneath the pictures, you’ll find the source code that you will need to snag for your blog. (6) Simply click anywhere inside the box of code, and then copy the selection, as shown below:

Step two: into your blog

If there’s a part that could be considered the least bit tricky, then this is it. I’m going to do a two-part explanation for both WordPress and MovableType users, and if you’re not using one of these platforms, then you ought to be able to infer what needs to be done because the differences between platforms are almost purely semantic.

The starting condition for all of these examples is that you’ve just copied the code from the Flickr badge creator…

WordPress
Venture into your WordPress administration panel and click on the “Presentation” tab. You will then be presented with two “sub tab” options, “Theme,” which is selected, and “Theme Editor.” Choose “Theme Editor,” and then you’ll have to choose the file or files in which you would like to include your Flickr photo stream. In order to help you choose the right file, use this checklist below:

  1. Do you want the pictures to appear in the sidebar?
  2. Do you want the pictures to appear somewhere on the main page of your site, either before or after your blog entries?
  3. Do you want the pictures to appear on a different page altogether?

If #1 is for you, then choose the file “sidebar.php.” If #2 is more your speed, choose “index.php.” If #3, you’re kind of on your own there, but I’m going to assume that you probably know enough to choose the appropriate file.

Once your file is loaded into the WP administration panel, select where you want the pictures to reside within the code, and paste the copied Flickr code in that location. To continue with the tutorial, click here to move on to styling your Flickr badge code.

MovableType
The default MT installation provides you with template files, and I’ll be using those default names as reference points during this tutorial. For the sake of simplicity, let’s assume you would like to display your photos on the main page of your site.

Log in to your MovableType installation and choose the “Templates” option from the navigational menu. Choose the file called “Main Index,” and it will load up in a box that will allow you to edit the source code for that page. You’ll likely have to scroll down a ways to get beneath the header code, and the first thing you should look for are the MovableType entry display tags that look like this:

<MTEntries>
...some code here to cycle through your posts...
</MTEntries>

Now, if you want your photos to appear before your entries, then simply paste the Flickr badge code before the first MTEntries tag. If you’d like the photos to appear after your posts, then paste the code after the closing MTEntries tag. Once you’ve pasted the code in your desired location, you’re ready to begin styling!

Styling up your code

At this point, you should now have a block of code in one of your blog templates that looks like this:

<!-- Start of Flickr Badge -->
<style type="text/css">
/*
Images are wrapped in divs classed "flickr_badge_image" with ids
"flickr_badge_imageX" where "X" is an integer specifying ordinal position.
Below are some styles to get you started!
*/
#flickr_badge_uber_wrapper {text-align:center; width:150px;}
#flickr_badge_wrapper {padding:10px 0 10px 0;}
.flickr_badge_image {margin:0 10px 10px 10px;}
.flickr_badge_image img {border: 1px solid black !important;}
#flickr_badge_source {text-align:left; margin:0 10px 0 10px;}
#flickr_badge_icon {float:left; margin-right:5px;}
#flickr_www {display:block; padding:0 10px 0 10px !important; font: 11px Arial, Helvetica, Sans serif !important; color:#3993ff !important;}
#flickr_badge_uber_wrapper a:hover,
#flickr_badge_uber_wrapper a:link,
#flickr_badge_uber_wrapper a:active,
#flickr_badge_uber_wrapper a:visited {text-decoration:none !important; background:inherit !important;color:#3993ff;}
#flickr_badge_wrapper {}
#flickr_badge_source {padding:0 !important; font: 11px Arial, Helvetica, Sans serif !important; color:#666666 !important;}
</style>
<div id="flickr_badge_uber_wrapper"><a href="http://www.flickr.com" id="flickr_www">www.<strong style="color:#3993ff">flick<span style="color:#ff1c92">r</span></strong>.com</a><div id="flickr_badge_wrapper">
<script type="text/javascript" src="http://www.flickr.com/badge_code_v2.gne?count=10&display=latest&size=t&layout=x&source=user&user=18867172%40N00"></script>
</div></div>
<!-- End of Flickr Badge -->

Right now, it looks like a bit of a mess, but you’ll be happy to know that most of that code is totally unnecessary (at least in my opinion). I want you to edit that Flickr badge code so that it ends up looking like this:

<!-- Start of Flickr Badge -->
<style type="text/css">
.flickr_badge { float: left; }
.flickr_badge img { width: auto; height: 100px; padding: 5px; margin: 0 10px 10px 0; border: 1px solid #000; background: #ccc; float: left; }
</style>
<div class="flickr_badge">
<script type="text/javascript" src="http://www.flickr.com/badge_code_v2.gne?count=10&display=latest&size=t&layout=x&source=user&user=18867172%40N00"></script>
</div>
<!-- End of Flickr Badge -->

Looks a little more friendly, doesn’t it? In the above code, the only thing you really need to be worried about is what falls between the two <style> tags. Let me explain what each item does:

.flickr_badge { float: left; }

All that line does is provide for a container within which your pictures will appear, in effect setting that area apart from the rest of the code in your blog template.

.flickr_badge img { width: auto; height: 100px; padding: 5px; margin: 0 10px 10px 0; border: 1px solid #000; background: #ccc; float: left; }

Specifically, the above style declaration determines how your Flickr photos will appear on your site. In my example, your pictures will each appear 100px high with an adjusted width that maintains the original photo’s aspect ratio. In addition, there will be a 1px black border around the photo that surrounds a 5px gray (#ccc) area that will effectively “frame” each picture. Finally, your pictures will be neatly positioned next to one another with 10px between them, as determined by the “margin” declaration and also the “float: left” property. Note: “float: left” merely tells the browser to display the photos next to one another horizontally.

Now, if you would like to style your pictures differently, simply tweak the values in that line of code. Don’t want that 5px “frame” effect? Delete “padding: 5px.” Want a red border with an orange frame? Change “border: 1px solid #000″ to “border: 1px solid #f00″ and “background: #ccc” to “background: #f90.” Want a dotted border around your pictures? Change “border: 1px solid #000″ to “border: 1px dotted #000.” Want your pictures to display vertically instead of horizontally? Just remove the “float: left” property (but leave it in the surrounding “.flickr_badge” declaration). Still hungry for more CSS info? Check out the W3C’s guide to CSS styling.

Hopefully you’ve found this tutorial helpful, because that’s all you get from me! Seriously, though, if you use this technique to pimp your blog, I want to know about it! Send me a link so I can check out your awesomeness!

56 Comments ↓

#Dennis  at 12:16 pm on Mar 27, 2006

Very detailed. Youe peeps should like this.

#Dennis  at 9:54 am on Mar 30, 2006

What is the link to your flickr profile?

#eamon  at 4:59 pm on Mar 30, 2006

I recently discovered that attempting to learn html is a complete waste of time.

Find what you want the site to look, find someone that has done something similar and steal it.

You have done one better and explained it in a way that s complete idiot like me could understand.

Thank you so much

#Chris P.  at 5:39 pm on Mar 30, 2006

Dennis, I thought you could get there by clicking through one of my pictures on the main page of this site…but for clarity’s sake, here it is:

My Profile

#Bullock  at 6:45 pm on Mar 30, 2006

Thanks man. The clicker must be busted on the pictures at the top of the post. Peace out!

#Chris P.  at 6:46 pm on Mar 30, 2006

That was just a .gif…I did that so the post would load faster, knowing that it was going to be so image-heavy to begin with.

Sorry for the confusion - I probably should have mentioned that!

#Alisa  at 3:50 pm on Jun 21, 2006

Thank you so much for the information! It was exactly what I was looking for…You are my hero of the day.

#Nathan Dunn  at 12:49 am on Aug 14, 2006

Thanks for the tutorial - this is a great idea. Do you have problems with the layout in Firefox? It looks fine in IE, but when I view my sample in Firefox, the pictures “cascade” from upper left to lower right, rather than sitting next to each other horizontally. Any ideas? Tx.

#Chris P.  at 12:51 am on Aug 15, 2006

Mine look fine in FF. What version are you running?

#Zoe  at 7:55 am on Aug 24, 2006

Thanks, this was really helpful. One tricky thing - I couldn’t find the badge link where you described it. I did find it under http://www.flickr.com/tools/

#Chris P.  at 10:11 am on Aug 24, 2006

They’ve probably changed its location, as it was just as hard to find before.

I need to update this bad boy.

#Tom  at 4:11 am on Aug 25, 2006

Shucks, I’m completely stumped and don’t actually know how to make the images line up horizontally. Everything I do is all vertical. Any help?

#Chris P.  at 2:05 am on Aug 26, 2006

Tom,

You need to apply a float: left CSS property to your images. It’s explained in the tutorial above, though, so you should have no problem.

#Russell James  at 5:19 pm on Aug 26, 2006

Thanks for that, I’ve now managed to add Flickr photos to my sidebar. I love what you done with some of the blogs I’ve seen and I will be contacting you as I’d love you to totally pimp my blog!

#Tom Barrett  at 3:34 am on Aug 28, 2006

I even copied your code on the site and still they do not align horizontally :(

#Chris P.  at 12:43 pm on Aug 28, 2006

Tom, what browser are you using?

#Tom  at 10:11 pm on Aug 28, 2006

I’m using the latest firefox. I’ve no idea what’s wrong. :(

#sheffner  at 4:09 am on Aug 31, 2006

Hi, great tutorial. I followed your instructions, but when I got to the sidebar doc in my WordPress, it says (at the bottom, helpfully, so I don’t read it until I’ve finished making my changes) “if this file were writable, you could edit it.” So,,, how do I make it writable?

#Chris P.  at 10:44 am on Sep 1, 2006

Sheffner,

Your best bet is to use an FTP client to access your files. That way, you can make any changes you want, and then you can simply upload the updated files to the server instead of relying on WordPress.

On Windows machines, I’m partial to CoffeeCup FTP, which is a free FTP client that has a very intuitive Windows-like interface.

Once you’ve installed an FTP client, you will need to log into your FTP server in order to access the file that you need to change. In just about every case I’ve ever heard of, your Web host either:

has already provided you with details about logging into your FTP server
or you can call your hosting company, and they can provide you with the appropriate details for your FTP server

Assuming you’ve gotten that mess figured out, you need to locate the root folder where your WordPress is installed, and then navigate to the following:

WP_ROOT/wp-content/themes/[your active theme]/sidebar.php

Open that file up, and then make the edits manually using a program like Notepad++ or your XHTML editor of choice. Once you’ve edited the file, upload it to the server again and overwrite the older version.

If you’ve coded it up right, you’ll see the results you were after!

#Dennis Goedegebuure  at 1:35 pm on Sep 2, 2006

Great post and veryhelpfull.
Any idea how I can upload in Typepad?

#miltownkid  at 10:52 am on Sep 9, 2006

My blog just gained +46 sexy from that post. Thanks!

#sue  at 10:43 pm on Sep 12, 2006

hi chris
i don’t get the ‘theme editor’ option on my wordpress, but i guess that’s because i’m using the free version.
BTW thanks for the pressrow theme, i really love it, the only negative is there is no place for a tagline. Can I put one in somehow?

#Asma  at 4:27 am on Sep 20, 2006

Classy … !!!

Such a nice blog … love it :)

#CBP  at 8:20 pm on Sep 27, 2006

Great explanation. Is there a way to split the 10 photos into two vertical columns of five each?

#CBP  at 11:44 am on Sep 29, 2006

Well, with some research I learned how to split a badge of ten photos into two columns. You can find the directions here: http://www.flickr.com/forums/help/2396/. Tricky stuff!!!

#farah  at 9:52 pm on Oct 1, 2006

thank you soo much for these!!!!!thank you!

#farah  at 10:18 pm on Oct 1, 2006

p/s: i don’t think it works in opera. everything is veritcal though. But then again, thank you! :)

#MrC  at 10:40 pm on Oct 7, 2006

great help, thanks!

#kars  at 10:28 pm on Oct 25, 2006

i just wonder why it doesn’t show up if I put it in one of the widgets. Im only using a free wordpress blog.

help.

#Chris P.  at 10:46 pm on Oct 25, 2006

Kars,

For WordPress applications, there is a plugin called FlickrRSS that is far better suited to this task than hard-coding the entire thing like you see in this post.

I’m not sure, but I thought that WordPress.com offered a FlickrRSS widget…

#Emma  at 11:48 pm on Nov 10, 2006

Chris P, theres definitely a FlickRSS plug-in, I’m not sure if its a widget though. On the free wordpress widget guide (http://wordpress.com/features/sidebar-widgets/) the example given is a flickr widget so it must be possible..

I prefer the hardcoding approach myself though, spelt out like this it’s not hard.

Many thanks for writing this article, it was just what I needed!

Emma

#links for 2006-11-15 « squarechick  at 9:38 am on Nov 15, 2006

[...] How to: Add a Styled Flickr Photo Stream to Your Blog | Pearsonified (tags: blog Blogging flickr wordpress) [...]

#Tracey  at 10:28 pm on Feb 28, 2007

Hey - great tutorial, thanks.

I’m trying to update our site, which someone else wrote who has WAY more code know-how than I do.

Anyway, her flickr badge code looks quite a bit different, and I was wondering if anyone had any tips on changing it. Right now we have 6 pics, lined up in 2 vertical columns. I’d like the same layout, but horizontal (in two rows or three.)

Here’s the code now:

Gallery

(from http://www.opirgkingston.org)

Thanks again!

#CFman  at 11:36 am on Apr 20, 2007

Anyone figure out how to change where the images link to in a Flickr badge? Seems tied up with javascript src URL…

#Iris Kao  at 2:35 pm on Jun 30, 2007

Thank you for cleaning up flickr’s code. I couldn’t figure out what all the styles were and what they do.

After looking at your post, I finally was able to style it the way I wanted.

#Nichole  at 7:26 am on Jul 10, 2007

Thanks! This was just what I was looking for.

#Andrew  at 10:28 am on Jul 24, 2007

Thanks a bunch, very helpful!

#theCoup  at 2:25 pm on Jul 26, 2007

Great tutorial. Thanks for taking the time to share with the rest of us.

Flickr’s badge creator offers the option to show photos of yours with a particular tag. It doesn’t seem to be working though. Has anyone else had trouble with this? Any solutions?

#Jay  at 2:27 pm on Aug 8, 2007

Great tutorial, thanks!

#Nick  at 7:07 pm on Aug 25, 2007

This is still very useful. Thanks.

#Chris  at 9:13 pm on Aug 28, 2007

Just wondering.. u know how when you hover your mouse on the image you will get the title of the image you set on flickr? How do you grab that title and display it on your page?

#tiff  at 9:52 pm on Sep 15, 2007

Can someone explane where should i paste the code into? What this mean “website where you’d like your badge to appear”. please answer to me right away so i can do it. thank you very much.

#Justine  at 10:30 pm on Sep 16, 2007

Thanks for this! Finally one I was able to understand enough to put together! thanks!!!!!

#anh duc  at 12:06 pm on Oct 3, 2007

how can i paste my badge on my yahoo blog

#anh duc  at 3:07 pm on Oct 3, 2007

how to do this for my yahoo blog

#Angela  at 2:59 am on Oct 30, 2007

got to the last step but cant find wordpress or MT…got the code but dont know where to put it….help~~

#.:WwW.Mr-LoL.Info:. » Pimp your Blog with a Widget  at 3:47 pm on Dec 31, 2007

[...] Pros: The widget can add a personal touch to your blog, specially if you spend some time customizing the style. Chris Pearson has an article on this topic titled “Add a Styled Flickr Photo Stream to Your Blog.” [...]

#Arkadas Arama  at 5:14 pm on Jan 14, 2008

how to add this to a website ?

#marikeeler  at 2:32 pm on Mar 10, 2008

Hi: great idea and i’m almost there! but i’m running into an issue, which im not sure if its my browser of what (FF).. but where exactly on the sidebar.php (wordpress) do i place the code if i want the pics to show after the last thing on the sidebar. i’m placing it in all kinds of different areas and nothing shows..

help!

#chantel  at 11:47 am on Mar 23, 2008

Thank you so much for this, you really helped me.

#caixiaoeva  at 8:26 am on Mar 30, 2008

Hi, this is eva. My blog’s sidebar is using your styled flickr photo code. But as you can see from my blog, it’s not horizontally positioned. It’s very weird. It’s naturally vertical. Although I delete “float: left” to see if there would be any changes, nothing happens. Then I think maybe it’s because of the height and margin, so i fixed the height to be 70 px and margin to be 5px. The thumbnail is smaller but it’s still vertical. Plz help me out.

#mike  at 12:27 pm on May 29, 2008

Awesome article! Still getting referenced after sooo long! Question: how dow I change the code so that the photo links open in a new window (As opposed to same page)?

#Chris P.  at 12:23 pm on Jun 4, 2008

Mike — You simply need to add the target="_blank" attribute to your anchor (<a>) tags.

#berend  at 8:52 am on Jun 11, 2008

By default the flickr images on the weblog will be clickable. Is it possible to just display the images without the clicking?

#13 tools to spice up your Flickr photos (or the way you view them)  at 8:41 am on Jun 12, 2008

[...] http://www.pearsonified.com [...]

#Henrik  at 12:56 pm on Jul 8, 2008

Thank you for the tip!

Hoot and/or Holler ↓

discount ambien prices generic ambien sleeping pill ,generic ambien non rx discount ambien sleeping pill |cheap ambien purchase discount ambien non rx buy ambien on line ambien side effect ,purchase ambien overnight ambian purchase ambien discount overnight ambien 5mg buy ambien non rx |buy ambien canada |generic ambien 10 mg order ambien usa ambien CR 6,25 mg buy ambien 10mg ,purchase ambien 5 mg ,order ambien online ,buy ambien prices ,ambien CR 6.25 mg buy ambien non prescription ,generic ambien ,ambien non rx required |buy ambien CR 6,25mg ,overnight delivery ambien ambien sleeping pills ,overnight ambien usa cheap ambien for sale |generic ambien sleep aids ,cheap ambien prices buying ambien online ,online ambien price ,buying ambien 10mg |purchase ambien non prescription ,purchase ambien prices ,generic ambien order |buying ambien CR 6.25mg |ambien 5 mg |buy ambien |purchase ambien canada cheap ambien sleep ,ambien no rx overnight delivery ambien canada online ambien CR 6.25mg |ambien purchase ,ambien overnight |ambain ,buy ambien 10 mg online ambien discount cheap ambien CR 6,25mg ,overnight ambien sleep aid |generic ambien 10mg ,cheap ambien side effects buying ambien sleep discount ambien overnight delivery cheap ambien sleep aid |overnight delivery ambien uk discount ambien usa ambien sales ,ambien uk ,generic ambien CR 6,25mg overnight delivery ambien purchase |discount ambien no rx ,overnight ambien side effect ,online ambien without rx |buy ambien 5mg ,overnight ambien for sale ,ambien buy discount ambien buy |overnight ambien cheap buy ambien no prescription discount ambien cheap |discount ambien without prescription buying ambien 5mg ambien price generic ambien overnight delivery ,online ambien 5mg |buying ambien sale |generic ambien canada overnight ambien sleep |ambien side effects |online ambien sales ,ambien |buying ambien no prescription generic ambien sales ambien sleep aids buying ambien discount |online ambien sleep aids buy ambien usa ambien without rx generic ambien non prescription cheap ambien on line |ambien prices ,overnight ambien no prescription ,buy ambien discount
ambien online ,overnight ambien buy cheap ambien online purchase ambien sleeping pills ,online ambien cheap overnight delivery ambien price order ambien cheap ,order ambien sale buy ambien online ,Ambien CR buy ambien CR 6.25mg ambien sleep ,discount ambien without rx buying ambien CR 6,25mg overnight ambien sleeping pill overnight ambien price generic ambien without rx |order ambien without prescription cheap ambien overnight delivery ,discount ambien overnight buying ambien ambien non rx |generic ambien online buying ambien on line overnight delivery ambien sales generic ambien sale order ambien for sale |overnight delivery ambien sleep cheap ambien 5 mg cheap ambien no rx overnight ambien online |cheap ambien side effect |discount ambien non prescription online ambien sleep aid |online ambien 10 mg |online ambien canada ,generic ambien no prescription ,purchase ambien 5mg buying ambien overnight buying ambien uk overnight ambien prices ,cheap ambien 10mg ,buying ambien without prescription purchase ambien ,overnight ambien sales |cheap ambien sleeping pills order ambien on line ,cheap ambien 10 mg ,ambien with no prescription discount ambien purchase |ambien with non prescription ,online ambien 5 mg online ambien side effect overnight ambien discount generic ambien purchase ambien on line overnight ambien canada ,cheap ambien sales ,ambien CR 6.25mg discount ambien on line overnight delivery ambien usa |purchase ambien uk online ambien overnight delivery ,buy ambien sleeping pill |generic ambien cheap ambien non prescription ,cheap ambien overnight |buy ambien without rx purchase ambien on line ,online ambien no prescription |buying ambien side effects ,cheap ambien |discount ambien 5 mg overnight ambien order discount ambien sale ,buy ambien sale ambien no rx required |generic ambien side effects overnight ambien without rx |generic ambien no rx |purchase ambien 10 mg cheap ambien without prescription ambien 10mg overnight delivery ambien prices |cheap ambien uk purchase ambien CR 6,25mg cheap ambien without rx ,buying ambien sleep aid buy ambien side effect ,order ambien overnight delivery buying ambien prices,online ambien without prescription buy ambien overnight delivery generic ambien for sale ,overnight delivery ambien order order ambien sleeping pills